PyTorch - Coffee Bean Classifier Project ☕️

I am quite obsessed with coffee to the point where I even bought an espresso machine to make a cappuccino every morning before heading to school. So when I saw a Coffee Bean Dataset (opens in a new tab) on Kaggle, it was a no brainer for me to use what I have learned in PyTorch into play.
For this dataset, four roasting levels with its bean type are addressed: Green/Unroasted and lightly roasted coffee beans are Laos Typica Bolaven. Doi Chaang are the medium roasted, and Brazil Cerrado are dark roasted. All coffee beans are Arabica beans.
Luckily, the dataset has been pre-sorted into /test and /train folders. The distribution was 75:25, which I thought was appropriate and I decided to proceed with how the data was split and change the distribution later on if the training data was insufficient.
First thing was to check whether the files and images are being read properly. One of the simplest way is to use matplotlib to display the images. Keep in mind that the image needs to be transformed into an array for matplotlib.
# Check if image/file path works properly
rand_img_path = random.choice(train_path_list)
img_class = rand_img_path.parent.stem
img = Image.open(rand_img_path)

img_as_arr = np.asarray(img)

plt.figure(figsize=(3,3))
plt.imshow(img_as_arr)
plt.title(f"Bean Type: {img_class} | Info: {img}")
plt.axis(False);
Next, I decided which models that I wanted to utilize for this multi-classification problem. There are a lot of options but because I wanted to deploy it to Hugging Face Spaces, I wanted a pretty small model that could do the job.
I used effnetb2 before, which worked really well but it did take some time for my computer to train. However, effnetb1 has less parameters and a smaller size, and as the problem is not too complex, I wanted to try effnetb1 and also the effnetv2_s model, which I have never used before. I imported the default weights and transforms necessary for each model, then I transformed both the training and test data accordingly.
# Import Default parameters
effnetv2_s_weights = torchvision.models.EfficientNet_V2_S_Weights.DEFAULT
effnetv2_s_transforms = effnetv2_s_weights.transforms()
effnetb1_weights = torchvision.models.EfficientNet_B1_Weights.DEFAULT
effnetb1_transforms = effnetb1_weights.transforms()

# Dataset -> Image Folder
train_data = datasets.ImageFolder(train_dir, transform=effnetv2_s_transforms)
test_data = datasets.ImageFolder(test_dir, transform=effnetv2_s_transforms)

# IMPORTANT if you want mps support on Apple silicon device
NUM_WORKERS = 0 # for mps activation

# Import model and its weights
effnetv2_s = torchvision.models.efficientnet_v2_s(weights=effnetv2_s_weights)

# Freeze params
for params in effnetv2_s.parameters():
    params.requires_grad = False

# Adjust the classifying parameters based on the problem ( 4 classes )
effnetv2_s.classifier = torch.nn.Sequential(
    nn.Dropout(p=0, inplace=True),
    nn.Linear(in_features=1280,
              out_features=len(class_names),
              bias=True).to(mps_device)
)
One thing that I didn't know was that in order to use the gpu on Apple silicon, it is crucial to set the number of workers to 0. I'm not too sure why this is the case because it's usually advised to use the maximum cpu core count but this works! Here's a thread (opens in a new tab) for any future fixes.
We have all the data as an image folder format, so we can create dataloaders from it.
# Dataloaders
train_dataloader = DataLoader(train_data,
                               batch_size=BATCH_SIZE,
                               shuffle=True,
                               num_workers=NUM_WORKERS,
                               pin_memory=True)

test_dataloader = DataLoader(test_data,
                               batch_size=BATCH_SIZE,
                               shuffle=False,
                               num_workers=NUM_WORKERS,
                               pin_memory=True)
Now we train and test our model as always. I'll exclude the code but you can check it out in my github repo (opens in a new tab) here as it's mostly the same process from my last post.
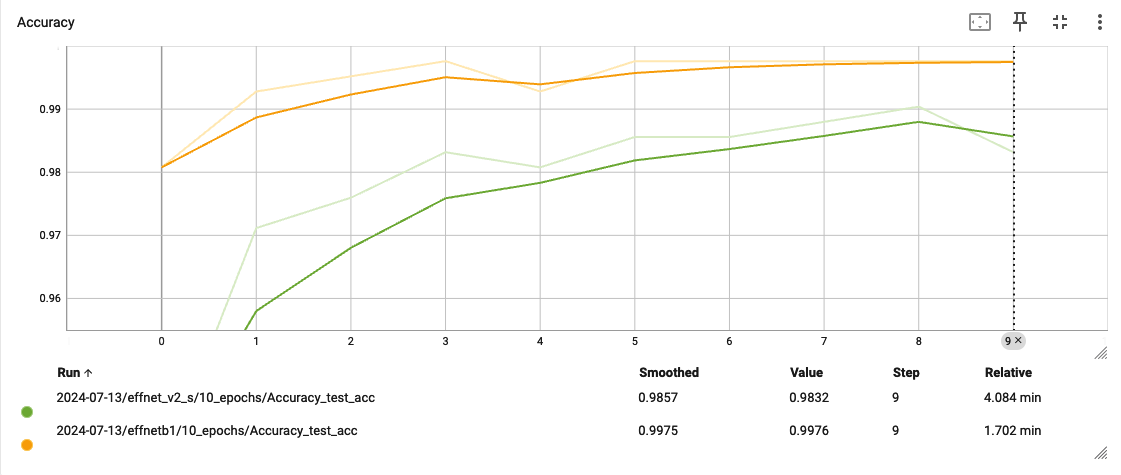
Comparing Test Accuracy
Comparing Test Loss
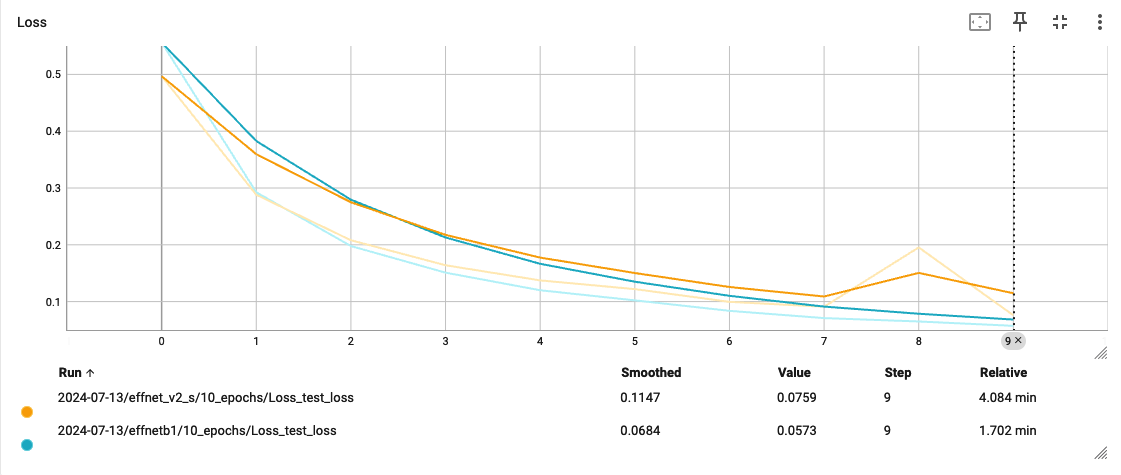
After training and testing, I did some comparisions on Tensorboard between the two models on test accuarcy and loss. It seemed that the smaller effnetb1 model performed better in both criterias; possibly as the problem is quite straightforward, additional parameters might have actually cause more complications.
This is good news as I wanted the smallest model possible in order to deploy it online.
Lastly, I deployed the model to Hugging Face Spaces where I can use my smartphone camera to classify my coffee beans at home and sort them by whether their roastings! Feel free to check the working example here! (opens in a new tab)
© Joe Lee.RSS